Search

Thursday
Feb132014

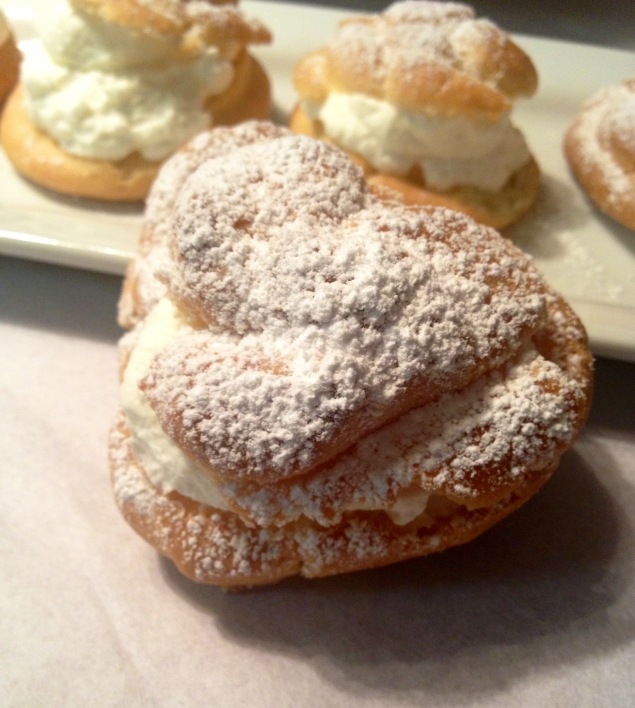
Party Desserts: One Bite Banana Pudding

I'm working on my menu for a charity event in Chicago next month... will have a Southern theme. The desserts will be an assortment of minis: pecan pie, peach tartlets and banana pudding. The host didn't want to have to worry with lots of small glasses. Here's my solution... I had some pate a choux left over from the previous post on cream puffs just hanging out in the fridge. What to do.... what to do? Then I see the fruit bowl out of the corner of my eye and it hits me! Put the insides of the banana pudding into puff shell! This dough makes the best little puffs and they are hollow. Perfect for filling. The experiment was a total success. Best of all, these tasted just like the banana pudding my mother used to make! BLISS! 

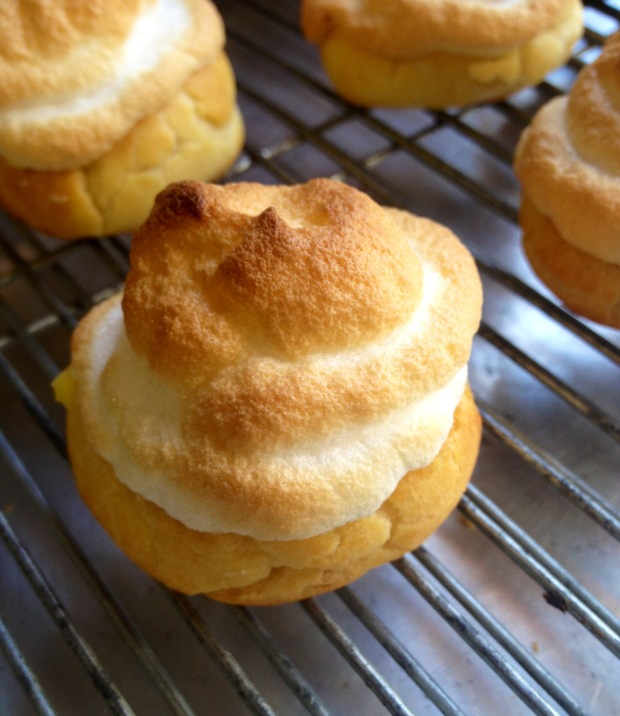
ONE BITE BANANA PUDDING

I have 3 components to this recipe: the pate a choux, the pastry cream filling and the meringue top. I have it broken down into segments below. You don't even have to do it all at one time. I made the choux the day before serving. I made the pastry cream the following morning and I made the meringue just before I wanted to put them in the oven. The meringue will not hold so plan on using it as soon as you whip it up. Hope you love these!

*CHEF'S NOTE: For assembly, you will need 1-2 ripe bananas

CREAM PUFF DOUGH RECIPE (Pate a Choux)

Makes about 22-28 small puffs depending on how large you pipe them out

Prep: 10 minutes    Bake: 20 minutes   Difficulty: Intermediate

Supplies: Cookie sheet, parchment paper, piping bags or ziptop bags (don't use a cheap one- it will break)

This is a classic Pate a Choux dough. I always mix mine by hand because I don't want to wash the extra bowl of the mixer but some believe (Alton Brown and Jacques Pepin for example) that you have to use a mixer to incorporate the eggs. I did a blind taste test and I cannot tell the difference in taste nor in texture or appearance.

1 cup water

1 stick unsalted butter

1/2 teaspoon sugar

1/8 teaspoon salt

1 cup all purpose flour

4 eggs 

Line a baking sheet with parchment paper. Get out a large measuring cup or short glass (I find a pint mason jar works great) and put the ziptop bag into it, open the top of the bag. This will give you some stability as you spoon the dough into the bag.

Preheat oven to 425 degrees F.

Put the water, butter, salt and sugar in a large saucepan and bring to a boil. Boil until the butter is just melted. Reduce the heat to very low. Add the flour all at one time, mixing with a wooden spoon. Cook over low heat until you start to see a little "film" on the bottom of the pan- only about 1 minute or even less. The dough will come together in a ball. Remove from the heat and allow to cool just a little bit but not too much; the dough has to be warm to accept the eggs. If the dough is too hot, you cook the eggs. This is not good.

If you are using a mixer, this is the time to transfer the dough to the bowl of your mixer. I use the same saucepan and put it on top of a dish towel to keep it from slipping around as I beat in the eggs. It is essential to add the eggs one at a time to your dough. I usually put all 4 eggs in a small bowl and just slip them in, one at a time, beating each with a wooden spoon until it is incorporated then I add the next egg and repeat. At first, it will seem as if you've made a mistake but do not stop. In a few seconds, the dough will go from slippery to a bit sticky as the egg is accepted into the dough. Do this 4 times. Take care not to be too aggressive with the wooden spoon because I have actually tossed an egg out onto the floor... that is how slippery the dough is in the beginning.

Once you have the eggs fully incorporated, spoon the dough into the pastry bag or ziptop bag you have set up. You can use it right away or it will hold beautifully in the fridge until you are ready to use it. I have waited a day or more, in fact, but let the dough sit out at least 20 minutes before you try to pipe it onto the baking sheet or you may blow out the side of the ziptop bag. Again, not good.

Pipe the dough into heart shaped or little puffs (see photo at the top) For the heart, draw the outside and then fill in the middle. For the puffs, I find that swirls don't cook as pretty as simply applying pressure to the bag until the puff is the size I want, then pull the bag back. It forms a little tip when you do this so before you put the into the oven, wet your finger with water and push down any little peaks so they don't burn.

Bake the puffs for 10-12 minutes at 425 degrees. Open the door and quickly rotate the pan and reduce the heat to 350 degrees for 10-12 more minutes. It is important not to simply switch the pan to an oven set to 350. The puffs will deflate.

I've had to trial and error this timing with my oven... and to my taste. I don't want dried out puffs but I also don't want them too wet or eggy. Grab one out, let it cool slightly and check the inside to see if it is what you want. If so, remove them from the oven. If not, give them a minute more.

Take a small paring knife or even a toothpick and puncture the top of the puff so the steam can escape. Allow them to cool on a rack before filling.

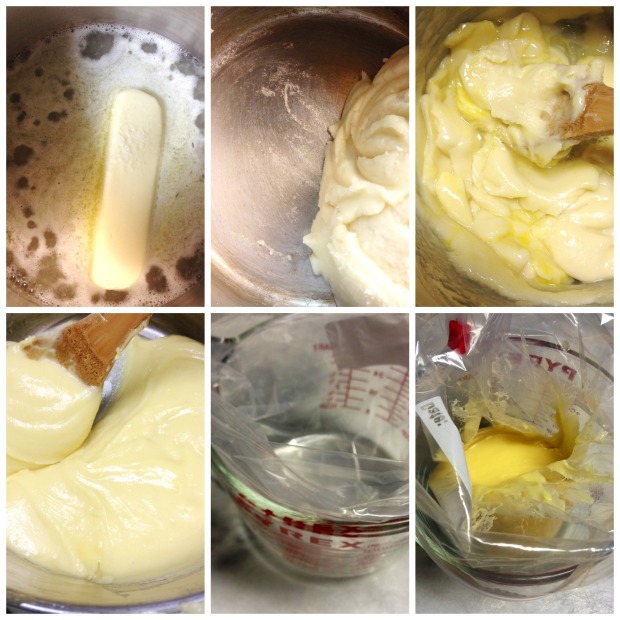
1. Boil the butter. 2. See the film. 3. Slippery. 4. Accepted. 5. Ziptop bag prep. 6. Ready to pipe.

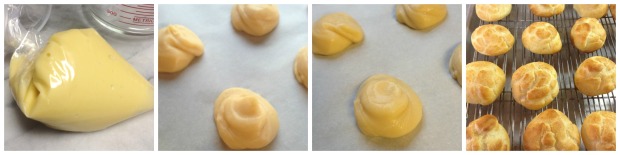
1. Piping bag filled. 2. Choux piped onto parchment. 3. Push down any peaks. 4. Pierce the top to release steam.

PASTRY CREAM

For my banana pudding, I did not use a vanilla bean like I normally would because I didn't want the bean flecks in the custard. 

Makes 2 1/2 cups

Prep: 5 minutes    Cook: 12 minutes      Chill: 10 minutes

Supplies: Large bowl filled 1/2 full with ice and water

1 cup heavy cream

1 cup milk plus 3 ounces more (a little more than 1)/2 cup)

2 teaspoons pure vanilla extract plus a tiny drop each of almond and lemon extract

8 egg yolks in a medium heat-proof bowl

1/2 cup granulated sugar

6 tablespoons cornstarch

1/4 stick unsalted butter 

Make an ice bath in a heat proof bowl by filling it 1/2 full with ice and water.

Put 1 cup of milk and the cream  in a large saucepan. Bring to a simmer. (you will see the little bubbles foaming around the edges of the pot)

Remove from the heat.

Add the sugar to the yolks and whisk for 30 seconds to help dissolve the sugar.

Put the saucepan back onto medium heat and bring it back to a simmer. Once you reach the simmer, temper the eggs by briskly whisking a small amount of the hot mixture into the eggs; keep whisking constantly; adding a little more of the hot mixture into the eggs. Continue whisking it in until you have it all incorporated and then return to the saucepan. 

Next, use a fork to whisk/dissolve the cornstarch into the remaining 3 ounces of milk. I just use the measuring cup because it shows the ounces on the outside. It is just under 1/2 cup of milk.

Put the saucepan back over medium heat. Whisk in the cornstarch mixture. Continue whisking or stirring over medium heat. As you are stirring, suddenly, you will notice it beginning to thicken up. Don't think you have ruined it or curdled it. Just keep stirring until it just comes to a boil and is thick. Remove from the heat. 

Put the saucepan into the ice bath you prepared earlier; take care not to allow any water to get into the pan and continue stirring to cool the custard a bit. Add the vanilla, almond and lemon extracts plus the butter and stir until it is completely melted and incorporated. Transfer to a bowl and cover the surface with plastic wrap or spoon into a piping bag. Refrigerate until ready to use.

ASSEMBLY

1. Slice the tips off of the puffs. Eat or save for later.

2. Pipe a dollop of pastry cream into the puff.

3. Slice a banana and add one slice on top of the pastry cream.

4. Pipe more pastry cream into each puff, filling it completely.

5. Make the meringue (see recipe below) and top each puff.

6. Bake until the meringue is golden brown.

7. Eat 3-4 as soon as they come out of the oven while warm.

MAKE THE MERINGUE TOPPING

I learned how to make meringue from my mom and I love the way hers was always so light and fluffy. However, my sweet and uber talented pastry chef friend, Geri-Martha taught me to first whisk the egg whites and the sugar together over a double boiler to dissolve the sugar so there is no grit remaining. For the photo above, I did not use the double boiler method, but for the party, I will. I like the texture better if you bother to do the double boiler step. Also, many people use cream of tartar or vinegar in their meringue. I don't because I personally think it creates more "shrinkage" where the meringue pulls away from the crust.

FYI: The ratio for meringue is 4:1. An egg white is about 1 ounce. Therefore you would use about 1 cup of sugar for every 4 egg whites.

CLASSIC MERINGUE RECIPE

4 egg whites

1 cup granulated sugar

Preheat the oven to 425. Line a baking sheet with parchment paper.

Put the egg whites and the sugar in your mixing bowl (make sure it is heatproof or use a heatproof bowl) over a double boiler that is simmering. Do not let the water touch the bowl and make sure the heat is not a full boil but a simmer.

Rapidly whisk the whites and sugar together until there is no grit remaining. This happens faster than you might think.

Remove from heat. Dry off the bottom and sides of the bowl. Put it on your mixer  stand with the whisk attachment. (if you do not have one, you can just use your hand-held mixer) Start at low speed for 30 seconds then increase the speed to medium high and beat until shiny and stiff peaks form when you lift the whisk from the bowl.

Immediately spoon the whites into a piping bag or ziptop bag. They will not hold long. Snip the tip of the bag and pipe onto your prepared shell taking care to "seal" the edges with the meringue.

Bake at 425 for 4 minutes or until golden brown. 

FOLLOW ME ON FACEBOOK, TWITTER  PINTEREST AND INSTAGRAM FOR MORE PARTY IDEAS, RECIPES AND FUN!

Wednesday
Feb122014

Valentine's Day Dessert Recipe: Heart-Shaped Cream Puffs

Cream Puffs are so simple and so delicious. Stuff them with just about anything you like: Pastry Cream, Chantilly Cream or Marscapone Cream but blackberry preserves and flavored whipped cream are the French classic version. If I have time, I make vanilla pastry cream for the filling which takes about 40 minutes to make and chill. If I don't have that kind of time, I simply add a few delicious flavors to some whipping cream and pipe it into the little puffs.

For Valentine's Day, I piped the dough into hearts... so easy and inexpensive and yet, so impressive. Nothing says I love you like a fluffy puff of dough stuffed with delicious cream! You can drizzle the top with chocolate, sit them in chocolate sauce or simply sift powdered sugar over them. You can do this.... I promise but please take the time to read the recipe all the way through before you start.  I have a step by step guide to walk you all the way through! This recipe and the pastry cream are versions of the tons of pate a choux recipes which exist. The two are pretty fool-proof and I have made them a million times. 


CREAM PUFFS WITH VANILLA BOURBON CREAM

Makes about 22 small puffs or about 15 heart-shaped puffs

Prep: 10 minutes    Bake: 20 minutes   Difficulty: Intermediate

Supplies: Cookie sheet, parchment paper, piping bag or ziptop bag (don't use a cheap one- it will break)

This is a classic Pate a Choux dough. I always mix mine by hand because I don't want to wash the extra bowl of the mixer but some believe (Alton Brown and Jacques Pepin do use a mixer) that you have to use a mixer to incorporate the eggs. I did a blind taste test and I cannot tell the difference in taste nor in texture or appearance.

CREAM PUFF DOUGH RECIPE (Pate a Choux)

1 cup water

1 stick unsalted butter

1/2 teaspoon sugar

1/8 teaspoon salt

1 cup all purpose flour

4 eggs 

Line a baking sheet with parchment paper. Get out a large measuring cup or short glass (I find a pint mason jar works great) and put the ziptop bag into it, open the top of the bag. This will give you some stability as you spoon the dough into the bag.

Preheat oven to 425 degrees F.

Put the water, butter, salt and sugar in a large saucepan and bring to a boil. Boil until the butter is just melted. Reduce the heat to very low. Add the flour all at one time, mixing with a wooden spoon. Cook over low heat until you start to see a little "film" on the bottom of the pan- only about 1 minute. The dough will come together in a ball. Remove from the heat and allow to cool just a little bit but not too much; the dough has to be warm to accept the eggs. If the dough is too hot, you cook the eggs. This is not good.

If you are using a mixer, this is the time to transfer the dough to the bowl of your mixer. I will just use the same saucepan and put it on top of a dish towel to keep it from slipping around as I beat in the eggs. It is essential to add the eggs one at a time to your dough. I usually put all 4 eggs in a small bowl and just slip them in, one at a time, beating each with a wooden spoon until it is incorporated then I add the next egg and repeat. At first, it will seem as if you've made a mistake but do not stop. In a few seconds, the dough will go from slippery to a bit sticky as the egg is accepted into the dough. Do this 4 times. Take care not to be too aggressive with the wooden spoon because I have actually tossed an egg out onto the floor... that is how slippery the dough is in the beginning.

Once you have the eggs fully incorporated, spoon the dough into the pastry bag or ziptop bag you have set up. You can use it right away or it will hold beautifully in the fridge until you are ready to use it. I have waited a day or more, in fact, but bring the dough to room temperature before you try to pipe it onto the baking sheet or you may blow out the side of the ziptop bag.

Pipe the dough into heart shaped or little puffs (see photo at the top) For the heart, draw the outside and then fill in the middle. For the puffs, I find that swirls don't cook as pretty as simply applying pressure to the bag until the puff is the size I want, then pull the bag back.

Before you put the into the oven, wet your finger with water and push down any little peaks so they don't burn.

Bake the puffs for 10-12 minutes at 425 degrees. Open the door and quickly rotate the pan and reduce the heat to 350 degrees for 10-12 more minutes. It is important not to simply switch the pan to an oven set to 350. The puffs will deflate.

I've had to trial and error this timing with my oven... and to my taste. I don't want dried out puffs but I also don't want them too eggy. Grab one out, let it cool slightly and check the inside to see if it is what you want. If so, remove them from the oven.

Take a small knife or even a toothpick and puncture the top of the puff so the steam can escape. Allow them to cool on a rack before filling.

1. Boil the butter in water with sugar and salt. 2. Add all of the flour and stir over very low heat until you begin to see a "film' on the bottom of the pan. 3.Remove from heat, add eggs, one at a time. Dough is slippery until the eggs are excepted. 4. The dough with all four eggs mixed in. 5. Put a ziptop bag over a glass or something to stablize it. 6. Put the dough into the corner of the bag and snip the end.  

VANILLA AND BOURBON WHIPPED CREAM FILLING

This is a fast and easy filling. Below I have included the recipe for pastry cream, which I dearly love but takes a bit longer to make.

1 1/2 cups whipping cream

1/2 cup Confectioners sugar

1/2 tablespoon Vanilla extract

1 tablespoon bourbon (I like Four Roses)

In the bowl of your mixer, add the whipping cream and sift in the Confectioners sugar with the mixer on low speed. Add the vanilla and bourbon. Increase the speed to high and beat until the cream forms peaks that hold... but careful not to over beat. Spoon into a ziptop bag and pipe into the center of the puff. OR for a more dramatic appearance, slice the top of the puff off, add a large mound of the cream and put the little top on it. Dust with Confectioners sugar or drizzle with chocolate.

VANILLA PASTRY CREAM

Pastry cream is a classic French filling and used for many purposes. It does take a while to make and chill before you can use it but it is beyond delicious! You can add bourbon or any other flavors you want.

Makes 2 1/2 cups

Prep: 5 minutes    Cook: 12 minutes      Chill: 30 minutes

Supplies: Large bowl filled 1/2 full with ice water

1 cup heavy cream

1 cup milk plus 3 ounces more (a little more than 1/2 cup)

1 vanilla bean, split lengthwise but not cut through

8 egg yolks in a medium heat-proof bowl

1/2 cup granuated sugar

6 tablespoons cornstarch

1/4 stick unsalted butter 

Put 1 cup of milk, the cream and the bean in a large saucepan. Bring to a simmer. (you will see the little bubbles foaming around the edges of the pot)

Remove from the heat and allow the bean to infuse the mixture for 15 minutes. While you are waiting, you can fill a large bowl 1/2 full with ice and cold water. Set aside.

Remove the bean, scrape out the seeds from inside the pod and stir them back into the milk-cream mixture. Discard the pod.

Add the sugar to the yolks and whisk for 30 seconds to help dissolve the sugar.

Put the saucepan back onto medium heat and bring it back to a simmer. Once you reach the simmer, temper the eggs by briskly whisking a small amount of the hot mixture into the eggs; keep whisking constantly; adding a little more of the hot mixture into the eggs. Continue whisking it in until you have it all incorporated and then return to the saucepan. 

Next, use a fork to whisk the cornstarch into the remaining 3 ounces of milk. I just use the measuring cup because it shows the ounces on the outside. It is just under 1/2 cup of milk.

Put the saucepan back over medium heat. Whisk in the cornstarch mixture. Continue whisking or stirring over medium heat. Suddenly, you will notice it beginning to thicken up. Don't think you have ruined it or curdled it. Just keep stirring until it just comes to a boil. Remove from the heat. 

Put the saucepan into the ice bath you prepared earlier; take care not to allow any water to get into the pan and continue stirring to cool the custard a bit. Add the butter and stir until it is completely melted and incorporated. Transfer to a bowl and cover the surface with plastic wrap or spoon into a piping bag. Refrigerate until ready to use.

TO SERVE: Several options. Dust with powdered sugar. Dip or drizzle with chocolate. Any-all are good! To make a quick chocolate drizzle: 4 ounces semi-sweet chocolate, chopped and 2 tablespoons heavy cream. Put in a microwave safe bowl and nuke for 15-20 seconds or so- just until the chocolate softens. Stir to incorporate and the chocolate is completely melted and smooth. You may need a few more drops of the heavy cream to get the consistency you like. ENJOY! You will make these for the rest of your life once you perfect them!

FOLLOW ME ON FACEBOOK, TWITTER  PINTEREST AND INSTAGRAM FOR MORE PARTY IDEAS, RECIPES AND FUN!

Wednesday
Jan152014

Soup Season: Delicious Sausage, White Bean and Escarole Soup Recipe

I love soup. There's hardly anything I like more than a warm bowl of something hearty when it is cold outside. This time of the year, a big pot of soup is the perfect way to feed a big crowd and this recipe for Sausage, White Bean and Escarole soup is not only fast, it is also very affordable. For game day or Winter Olympics viewing parties, you can serve this with a salad and some toasty garlic bread and you're all set!

SAUSAGE, WHITE BEAN AND ESCAROLE SOUP

Serves 6-8

Prep Time: 10 minutes

Cook Time: 25 minutes

INGREDIENTS

2 pounds of spicy or mild Italian sausage, removed from casing

1 medium yellow onion, diced

5 carrots, diced

3 stalks celery, diced

1 clove garlic, minced

5-6 whole canned tomatoes plus 1/2 cup of juice from Italian canned tomatoes

1 teaspoon fresh thyme

2 teaspoons kosher salt

1/2 teaspoon black pepper

splash white wine (or any) vinegar

1 cup white wine (optional)

5-6 cups low sodium chicken broth 

1 T. Worcestershire sauce

2 bay leaves

2 cans cannelini beans (white pinto beans, Great Northern beans)

2 cups escarole, chopped

Parmesan for garnish

Tabasco-optional

In a large Dutch oven, over medium high heat, brown the sausage, removed from the casing. Once the sausage is nice and brown, use a slotted spoon to remove it from the pan; drain on paper towels. Reserve. Drain all but 1 tablespoon of the fat from the pan. Let the oil get hot and add the onion, carrots and celery. Cook 3 minutes or until softened. Let the vegetables get nice and soft, stirring occasionally, about 3-4 minutes. Add the garlic. Cook one minute more. Add the sausage back to the pot. Add salt, pepper, and thyme. Add the tomatoes by crushing them with your hands into little pieces. Add the juice from the tomatoes, vinegar, Worcestershire, and the white wine to deglaze the pan, scraping up all of the browned bits from the bottom of the pan. Cook and stir for about 1-2 minutes.

Add the chicken broth, beans and escarole. Bring to a simmer. Reduce the heat and cook 10 minutes more. The soup is ready to serve when the escarole is wilted. Serve with toasty garlic bread and garnish with grated Parmesan.

Tuesday
Dec172013

Holiday Traditions: Southern Pecan Divinity Recipe

Another holiday tradition I grew up with is Pecan Divinity. I can remember standing on a kitchen chair at the counter, two teaspoons in hand, waiting for the moment my mom said "go" and I'd start dropping those little puffs of sugar onto the wax paper in front of me. Divinity is nothing but sugar and egg whites... it is hard to imagine that something so simple can be that delicious but there are a few tricks to getting it just right. If you notice in the photo, the ones on top are smooth and pretty- the ones on the bottom are more craggy. That is because I let the mixture cool too much before dropping the candy. You have to work quickly to get the pretty, silky looking texture.


1. Cook divinity on a day with no rain and no humidity. Let dry completely before storing. At least one hour.

2. Make sure you have an accurate candy thermometer. It is important to get it to exactly 260 degrees (hard ball stage) before you mix the sugar into the egg whites.

3. Work quickly. The candy looks best (somewhat shiny, not craggy) if you drop them while still hot. Once the candy cools off, it doesn't hold the shape as well and looks rough, not smooth on the exterior. It still tastes good, just doesn't look as pretty.


SOUTHERN PECAN DIVINITY RECIPE

*You will need a candy thermometer for this recipe and wax or parchment paper. 

2 1/2 cups granulated sugar

1/4 teaspoon salt

1/2 cup white Karo or light corn syrup

1/2 cup water

2 egg whites

1 teaspoon vanilla

1 cup pecans, toasted and chopped

Prepare two baking sheets with wax or parchment paper.

Add sugar, salt, syrup and water to a large heavy 2 quart saucepan.  Stir. Attach candy thermometer to the side of the pan but don't let it touch the bottom. Over medium high heat, cook the sugar mixture to the hard boil stage or 260 degrees. Don't stir it but you can swirl the pan around until the sugar dissolves, then just leave it alone. Watch the sugar carefully. It will take about 15 minutes to get to 260 degrees. While you are waiting, use a mixer to beat the egg whites to stiff peaks, beating constantly on high speed, about 4-5 minutes.

When the mixture reaches 260 degrees, remove it from the heat. With the mixer on the lowest setting, very slowly stream the hot sugar mixture into the egg whites. Then turn up the speed to high and beat constantly until the mixture holds its shape, about 5-6 minutes. Quickly fold in the pecans. Work rapidly and drop the candy by teaspoon onto the prepared baking sheet.

Let cool and dry at least one hour before storing the candy in an airtight container.

FOLLOW ME ON FACEBOOK, TWITTER AND PINTEREST FOR MORE PARTY IDEAS, RECIPES AND FUN!


Wednesday
Dec112013

Holiday Traditions: Mom's (Addictive) Fruit Cake Cookie Recipe

One of my favorite holiday traditions with my mom was starting our holiday baking the day after Thanksgiving. We always made spiced fruit cake cookies but we'd have to buy the ingredients over a few weeks so we could afford them. I remember the anticipation of watching the shelf fill up with the candied fruit: pineapple, cherries (yes, even the green ones) and how excited I was when we finally got the last ingredient. I still love those cookies... and they hold so many memories for me. 

I know. You hate fruitcake. I'm pretty sure I don't like most of them but I promise you these gorgeous little fruitcake gems are so addictive and delicious, you will not want to wait a whole year to make them again. These are the same mugs we used for Christmas Eve cocoa way back then!

MOM'S HOLIDAY FRUITCAKE COOKIES

Makes about 6 dozen depending on how large you make them.

INGREDIENTS

1 pound candied red cherries

1 pound candied pineapple

1 pound candied green cherries

6 cups pecans, roughly chopped

1 pound dates, chopped

2 tablespoons dark rum

3 cups plus 1 cup all purpose flour

1/4 cup Crisco shortening

1 cup granulated sugar

slight pinch kosher salt

3 teaspoons baking soda

3 tablespoons milk

4 eggs (room temperature)

1 tablespoon orange juice

1 teaspoon nutmeg

INSTRUCTIONS

The day before: chop the dates into small pieces and put them in a glass bowl. Add rum. Cover with plastic wrap. Let sit overnight to absorb the rum. You can leave this step out if you want but I find it makes the dates more delicious and the cookies have more flavor.  

Preheat oven to 375. Line your baking sheets with parchment paper. Get out 2-3 cooling racks.

Dice the candied fruit into small pieces and place in a very large bowl; I use the top of my cake carrier. Roughly chop the pecans and add to the fruit. Add the dates. Add one cup of the flour. Toss well to coat all of the pieces and break them up so they are not sticking together.

Next, whisk the baking soda into the milk and let it dissolve.

Mix the Crisco into the fruit. Add the remaining ingredients: sugar, remaining flour, salt, nutmeg, eggs, orange juice and milk with baking soda into the mixture.  Mix together with your hands but just until you no longer see the flour. Try not to over mix. The batter will be very dense. Use a small ice cream scoop or two teaspoons to drop the cookies onto the prepared pans, about 1 inch apart. 

Bake 10-12 minutes or until golden brown. Cool on the wire cooling racks.

The batter is very dense.

My mom's original recipe for her Christmas CookiesFollow me on Facebook, Twitter, Instagram or Pinterest for more recipes and fun!